By Jim Shanks
BASIC SELF-NOCKS - A self nock in its simplest form
is just a slot cut into the end of the shaft. But that is just
where it starts. Variations are limited only by imagination.
In this segment I will discuss the simple version of the self
nock using only hand tools. To make these nocks you will need
three hacksaw blades, masking tape, a pencil, sandpaper, emory
cloth, a clamp, a small file, artificial sinew or serving thread
and some glue (the last two items are optional).
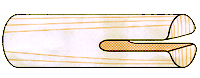
figure 1
The first step is to locate the nock on the end of the shaft
in the correct orientation to the wood grain. (See figure 1.)
The nock should be cut perpendicular to the grain. This will
reduce the likelihood of the wood splitting and will align the
shaft so that the stronger side (resistance to flexing) will
be against the bow’s riser.
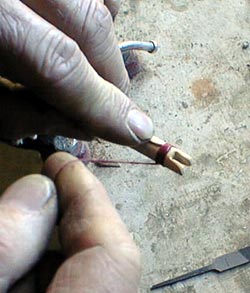
Take three hacksaw blades and tape them together using some
masking tape. The three blades taped together will cut a width
of approximately 3/32" (about .010"). Mark the location
and depth of the nock on the shaft with a pencil to use as a
guide for cutting the slot. I usually cut the nocks to a depth
of 3/8", but you can vary that if you choose to have a deeper
or more shallow nock. Clamp the shaft to a solid surface making
sure the clamp doesn’t mar or otherwise damage the shaft.
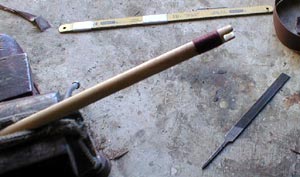
Using the three hacksaw blades taped together, carefully cut
the slot along the lines and to the depth marked on the shaft.
You may want to practice a little on some old shafts before you
take on that new dozen shafts that you just bought.
The easiest way to round out the bottom of the slot is to
use a piece of emory cloth. Take a strip about 6" long and
a half inch wide and twist it until you get it into a chord.
Take the chord and put it into the slot and pull it back and
forth to round out the bottom of the slot. Round out along the
edge as well as this will give the nock a "finished"
look You can use sandpaper or a small file to round out the flat
edges to your own taste. You may want to sand down the sides
of the nock so that the thickness is similar to the thickness
of a plastic nock.
The weakest point on an non-reinforced self nock is at the
bottom of the slot where the string makes contact with the shaft.
If the nock fails it usually splits here. As an option you can
reinforce the shaft by wrapping artificial sinew or serving thread
on the shaft below the end of the slot. Just wrap the string
around the shaft and put an ample amount of glue on all of the
thread to hold it in place. I typically use 5 minute epoxy for
this task. In a future article I will discuss self nocks that
are reinforced with a hardwood spline or pin.

