 |
Finishes: Part 1 - Gasket Lacquer
|
Gasket Lacquer is a heavy lacquer that is applied by dipping a shaft
through a rubber gasket, thus the name. Rumor has it that this material
was originally developed as a coating for pencils. In the last several
years this material has gained a lot of popularity in use as a finish for
wood arrows. The thing that makes it popular is its ease of use, fast drying
time, finish quality, and easy removal from targets.
There is not a lot of equipment needed to apply this material. A plastic
"Big Dipper" dip tube with a special gasket lacquer lid is all
that you need. The lid has a rubber gasket with several holes in the top.
Fill the tube up to about 2" of the top. You do not need to thin the
gasket lacquer. Before dipping, I like to dip an old shaft in first as
this will get some of the thick lacquer material up against the bottom
of the rubber gasket and will allow you to get full coverage of the shaft
when you dip it. I also like to put nock tapers on first and insert this
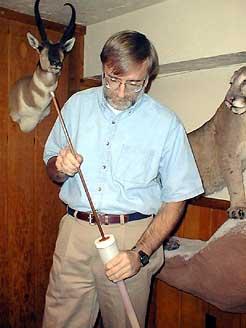
end into the tube. Dip the shaft all the way in, leaving only the amount
necessary to get a firm grip sticking out of the tube. In an even, moderately
slow motion, remove the shaft from the tube. (See photo) The rubber gasket
will squeegee the lacquer off leaving on only a smooth, thin coat. As you
are pulling the shaft out do NOT stop at any time as this will cause a
ridge to form on the shaft. After you pull the shaft out you can prop it
against a wall to dry or hang it from a clothes pin. The drying time of
this material is its greatest asset. In low humidity it will dry within
a minute or so. Even though you dip one shaft at a time, you can still
dip a dozen arrows in just a few minutes.
I normally put on three coats of lacquer. Between the first two coats,
sand the shaft with #000 steel wool until the finish is smooth to the touch.
Between the second and third (final) coat is when I put on the crest. (I
will cover cresting in a future article). A few tips: Each of the holes
in the rubber gasket is good for about 2 dozen arrows. If you try to use
the rubber gasket after it gets worn out, you risk getting a lumpy uneven
finish. After you are finished dipping your shafts, remove the rubber gasket
and let it set out for an hour or so. The lacquer will just peel right
off of the gasket. Try putting the gasket lacquer over water soluble aniline
dyes (described in an earlier article). It works great and you can get
a huge assortment of colors.
You can also get the gasket lacquer in several colors. I use the white
occasionally for a cap dip. The colored material is a little thinner than
the clear and takes a couple of additional coats to get good coverage.
Use Duco for fletching. Another thing that I forgot to mention, the material
does not have the pungent odor of Bohning lacquer, so you can use it inside
without complaints from your spouse.

