 The $18 Cresting
Machine
text and photos courtesy of Ron Shealer
The $18 Cresting
Machine
text and photos courtesy of Ron Shealer
The following gives your some instructions on how to make
a low cost cresting machine which nearlyh everyone can make at
home - provided you have a few basic hand tools such as a saw,
file, and a drill. I put this information together for my students
at school and my fellow traditional archers visiting the Stickbow.
The original power unit is a sewing machine motor complete
with the foot peddle control. I bought this motor and peddle
at a sewing machine repair shop for $15. I told the shop owner
I was building a project and asked if he had a motor and peddle
control off of a used sewing machine. He had several to chose
from.
After cresting a dozen arrows with the peddle control I decided
to try a dimmer switch for greater control of the turning speed.
A stop or control could be added to the peddle assembly but by
chance I had a dimmer switch/rheostat which wasn't being used.
The dimmer switch worked great, but be sure to turn it completely
off or unplug the motor when not in use as the switch could heat
up over time.
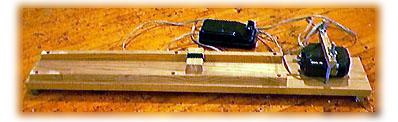
 The main chassis of the cresting
machine is a pressure treated 1" X 6" plank. I just
happened to have some scrap left over from a deck project. There
is nothing special about the wood, plywood can also be used.
The overall length needs to be longer than the arrows you are
working with as you will have to mount the motor on the board
and you may want to mount a control switch on the base. A light
could also be added to the machine if you really want to be fancy.
If you need somewhere to store your freshly crested arrows you
could add a piece of 2" x 4" with holes to stand your
shafts on end while they dry, I plan to add this feature later
on.
The main chassis of the cresting
machine is a pressure treated 1" X 6" plank. I just
happened to have some scrap left over from a deck project. There
is nothing special about the wood, plywood can also be used.
The overall length needs to be longer than the arrows you are
working with as you will have to mount the motor on the board
and you may want to mount a control switch on the base. A light
could also be added to the machine if you really want to be fancy.
If you need somewhere to store your freshly crested arrows you
could add a piece of 2" x 4" with holes to stand your
shafts on end while they dry, I plan to add this feature later
on.
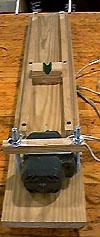
Under the main body I put two small strips of wood as feet.
This allows the cords to be placed under the whole assembly and
out of the way. I also mounted small rubber feet under the base.
I drew a center line on the board and mounted my motor in line
using two carriage bolts with wing notes. (Carriage bolts and
rubber feet $3) The bracket over the top of the motor has some
foam tape on the hidden side to help hold the motor in place
and dissipate any vibration.
Motor Mount 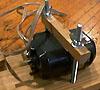
I made guide rails that are approximately 3/4" square
and nearly the length of the working base. If you do not have
access to a table saw to make the rails, some square trim found
at most lumber stores will work ( angle iron or aluminum will
also work). These rails contain the sliding block that supports
the arrow shaft. This sliding block can be moved from end to
end to account for shafts that may not be true. The sliding block
has a "v" cut into it to hold the shaft. I used a table
saw to cut the v but a hand saw or file should do the same job.
The "v" was then lined with felt. Felt "v"
blocks can also be purchased from some traditional equipment
suppliers. One fellow archer recommended using a small cloth
bag filled with lead shot to hold the arrow down in the "v"
block. Although I have yet to try this myself I think this would
be an asset as you would then have two hands free to do the cresting,
make adjustments, etc.
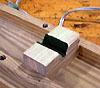 Sliding V-Block
Coupler made from surgical tubing 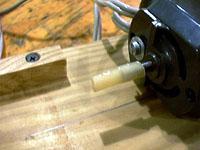
The arrow attaches to the motor by sliding a piece of surgical
tubing over the motor shaft and the nock or taper of the arrow
to be crested. This joint works well but it is sometimes challenging
to get the tubing over the arrow nock. If you are going to use
this type of coupler it may be best to crest your arrows prior
to gluing on the nocks. The tubing will slide onto the taper
easier than the nock. I was just looking for something quick
and simple. Couplers are available from a few of the traditional
equipment suppliers. A coupler could also be made on a metal
lathe with a set screw at one end to lock to the motor shaft
and an internal o-ring on the other end to grip the nock.
HAPPY SHOOTING!
Special thanks to
all of the Leather Wallers that passed on tips and suggestions.

