Finishing Wild Turkey Feathers
You have managed to acquire a batch of nice wild turkey primary
wing feathers, now what? You really have two options, do them
yourself or send them to someone and pay to have them done. Personally,
I do the latter, but I will describe a method to finish them
yourself if you are so inclined.
If you do prefer to send them off and have them professionally
done a good place to send them is Trueflight Feathers. They will
grind the bases of the feathers and return the full-length feathers
to you for $15 per 100. They will only do this work during their
slow time which is November – December. I have been very
pleased with the quality of the work that they have done and
they are pretty prompt with their service. Their address is P.O.
Box 1000, Manitowish Waters, Wisconsin 54545.
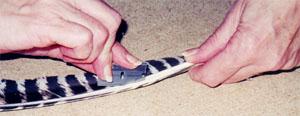
Splitting the quills and finishing the bases isn’t really
very hard to do. To start with you need to split the quill. I
have found that using a new (very sharp) single edge razor works
quite well. The primary wing feather has a trough that runs the
length of the feather. This trough is very prominent at the base
of the feather and fades out towards the end. Get a piece of
plywood or particleboard to work on. Use something that you don’t
mind scratching up. Push the razor through the middle of the
feather near the base end. (See photo on top). Push the corner
of the razor into the board so that it is secure. Keeping the
razor in place pull the feather through the razor splitting the
feather as you go. Use a slow steady speed.
Trim the ends of the feather off to the desired length that
you want, i.e. 5.5". You are now ready to sand down the
quill to desired thickness. It helps to look at a finished feather
to get an idea of what you are trying to achieve. There are two
ways to sand down the quill, either by hand or with a power belt
sander. If you are going to do a lot of feathers then you will
probably want to get proficient with the belt sander. Put the
feather into a straight clamp. If you don’t have a commercial
straight clamp you can make one using a couple of metal strips
and some binder clips that you can buy in any office supply store.
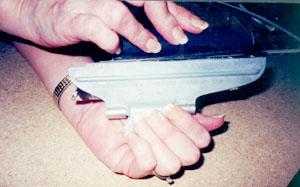
Using medium grade sandpaper and a sanding block sand down the
quill to about 1/16" thickness. This takes a little practice,
particularly keeping the plane of the quill surface perpendicular
to the feather. (See photo #2). The belt sander does it a lot
faster. You just have to be a little careful not to sand off
too much.
When you have completed the sanding you will probably have
a base that is a little wide for your taste. To trim the width
of the base, use a sharp single-edged razor and a metal straight
edge to trim it down. Now you can fletch and use a feather burner,
or use a chopper to cut the feather to its desired shape.
I like using turkey feathers for my hunting arrows. They seem
to be a little more sturdy than the commercial feathers and they
have more oil that makes them stand up better in wet conditions.
The only drawback is also what makes them so desirable –
their color. Natural barred feathers are hard to see in flight.
To get the best of both worlds, try splicing a bright color into
the back 1.5" or so of each feather. So where do you get
these feathers? The best advice that I can give is to let everyone,
particularly shotgun turkey hunters, know that you want them.
You would be surprised at how many turkey wings get thrown away
each year. If you have some that you don’t want, give me
a call, I’ll gladly take them off of your hands.

