Finishing Touches
Our bows milled and ready to be braced, let's get to the business of
stringing them up. Before we begin, a word about our enterprise. Please
award as many of these following tasks to small hands as you can. Though
I coach them as instructions to you, you must in turn decide which of your
helpers can do what.
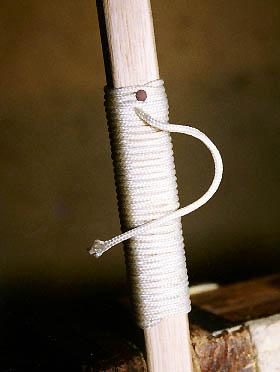
String
String
Number three braided Venetian blind cord (3/32 of an inch thick) makes
a quick and economical bowstring for kids' bows. Thick and soft enough
that it doesn't need to be served, it can be shot bare fingers. It stretches
with use, though, but we can compensate for that either by tying a timber
hitch on the bottom nook, or by making the top loop an adjustable knot.
Directions follow for the latter alternative.
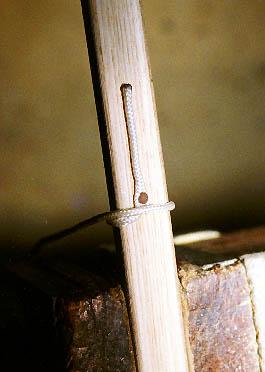
To tie a quantity of these strings quickly, make a simple string jig by
pounding two 6d finish nails part way into scrap stock at a distance three
and one half inches shorter than the nock shoulders of the bows.
Cut the cord(s) 10" longer than the distance between the nails. Around
one nail, tie a small bowline so that it will fit snugly over the lower
nook.
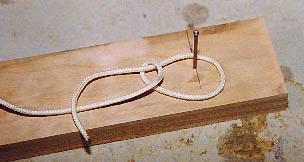

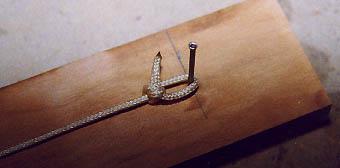
Stretch the cord to the far nail. Begin an overhand knot about 1 1/2" short of this nail, then pass the tag end of the cord around the nail and back through the overhand knot.
Snug up the overhand knot and tie a figure eight knot into the tag end of the cord so it cannot pullback through the overhand knot.
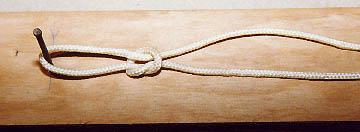

You can shorten the cord when it stretches by pulling on the tag end of
the figure eight to decrease the loop and then retying it closer to the
overhand knot. If the loop grows too small over time, simply retie the
overhand knot further down the cord.
Tiller
We began this series on the premise that laminated staves make bow building
predictable. Several important principles derive from this premise, but
none more attractive to the tyro than the prospect of mechanical tillering.
"Mindless tillering" I called it-the prospect of arriving at
tiller fearlessly-no mumbo jumbo, no incense on the end of the work bench,
no invocation of inscrutable spirits, no guess work, no dumb luck. Self
bows must accommodate a stave's every aberration, nuance and undulation
in the tillering process, and therefore require a steady stream of decisions
and evaluations. Laminated bows glued up from clean stock come to tiller
with mathematical precision.
The reason is that the act of lamination makes wood homogeneous. This
homogeneity allowed Forrest Nagler, in “Archery: the Technical Side,”
to prescribe the exact measurements of width and thickness at intervals
of
length along a backed stave such as ours with the certainty that should
the bowyer focus upon arriving at these measurements, the result would
be a bow tillered to full compass, within certain weight limits as well.
I have seen bows made in obedience to these measurements, and they came
up fine bows indeed. Bows of consequence, by deference.
Our technique for tillering required much less attention to detail.
Its only prescription was a uniform taper from the handle area to the nooks.
If we tillered with a jointer and paid attention, the bows came off the
jointer table fairly well tillered. If we attempted the taper by hand,
say with a jack plane as shown in photographs in the preceding essay, chances
are good that the bow has flat spots or weaknesses in the tiller because
the layout was imprecise or because hand planing removed wood unevenly.
String up some bows and let's look at them.
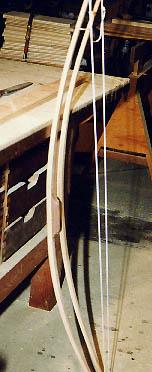
The bow in the background with the uniform taper came that way off the
jointer table. The bow withy walnut handle riser in the foreground was
hand planed to pencil marks scribed on the stave's end.The top limb shows
more stiffness than the bottom limb. See how much closer the string comes
to the upper limb than to the lower?
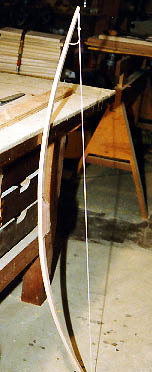
Remedies to tiller are simple. Scrape or plane wood off the stiff areas;
stay away from hinged areas,sections of limb that bend too much. Stop removing
wood when the bow responds by forming a gentle arc in the braced position.
Don't worry about weight on these bows. They should end up under 20 lbs.,and
kids will know how far to pull them.
Handles
Time now to form a handle. A variety of possibilities are available to
you. For example, if you didn't glue on a riser, mark out about a four
inch section in the middle of the bow. Wrap it with drapery cord, anchor
it at both ends with upholstery tacks, and secure it completely by swabbing
the cord with a wash coat of glue and water, mixed about two parts to one.
Shellac or varnish it after it is dry. You may wrap a handle/riser combination
the same way, providing the young shooter a corrugated grip.
 |
 |
If you wish to fill out the grip on a bow without a riser, tear old
bed sheets or similar cotton rags into strips of random length in widths
about 1/2 inch. Soak them in a wash coat of glue, about 3 to 1,squeeze
out excess moisture and wrap them to form a grip in whatever shape you
wish. They will dry and hold their shape. Either shellac them as is, or
wrap them with cord, glue them down again and then shellac them.
Finish
Finish
Assuming that all sharp edges have been radiused, that the bow is tillered
and sanded and handled, it is time to seal things up.
Lots of possibilities exist for a quick, easy finish. Water borne varnishes
apply with a cheap disposable foam brush, dry quickly and are odorless.
Paraffin, as described in Chapter 9 of the bow series in Traditional
Bowhunter also works nicely. However, the paraffin must be hot to flow
into the wood, so the danger of small hands attracted to a hot, messy,
gooey task should be considered.
l would recommend shellac. Amber or white. Kids can swab it on with foam
brushes or wipe it on with a cheesecloth pad dipped into the can. In either
case, disposable latex surgeon's gloves help keep clean-up to a minimum.
Steel wool between coats and over the last coat to smooth the finish ski.
If your intention is to decorate these bows with patterns or figures, avoid
the paraffin finish. Shellac works better than varnish here. Lay down one
or two coats, sand them out lightly, and then use colored markers on felt
tipped pens for your artwork. If you try to draw on raw wood, the ink will
fuzz away from your lines, and it may bleed into the finish you choose
to cover over it. However, almost any felt marker works on the top of shellac.
 |
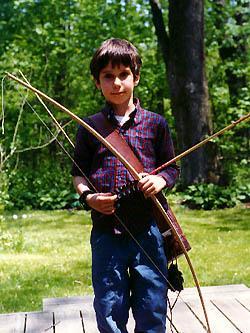
Mitch Grogg and friend, with a hickory bow inspired by Stickbow that he whittled and decorated himself. |
A word about shellac. If your crew has a tendency to glob it on, one coat
may be enough. Too many coats and shellac gets splotchy. Two coats with
a sponge brush, one followed by the second within 15 minutes, should be
plenty. Steel wool after the second coat has dried to smooth up the finish.Note,
too, that shellac has a shelf life. If yours does not dry within minutes
of application on a test piece,if it remains sticky, take it back to the
store for a refund.
Copyright 1997, Dean Torges