Building a wooden bow of your own device can seem a daunting task, what with the variety of tools, glues, limb designs, wood choices, curing controversies, tillering techniques, backings and blah, blah, blah--all of these decisions made more difficult by doubts about your woodworking skills, and then the whole effort built under the imperative that you end up with a hunting bow. Seems easier to choose new church membership or decide college enrollment or take a mate, such decisions as shape a life forever.
With this admission, let’s begin at the very beginning. Just as traditional archery for many of us rekindles a joy from our youth, let’s return to our youth and to the bows that gave it such joy. Let’s build a kid’s bow. Rather than pass down to kids the tillering mistakes that we’ve muttered and cursed over, let’s purposefully set out to have fun. Let’s build worry-free small bows as simply and as durably as we can, with minimal investment in materials and tools, and let’s build them quickly and in large numbers, enough to supply our neighbors and our relatives, too, should we choose. Yes, let’s arm the neighborhood. And most importantly, let’s do it in a way that our own sons and daughters can help, with significant, fearless contributions to the construction process. Let’s rediscover and share the joys of traditional archery while we endow the next generation. Let’s start back at the beginning.
Required:
To save money, go to a sawmill, especially a pallet sawmill, for your board. Hickory (which we prefer for kid’s bows) makes a common pallet board and is usually available at these places. Be sure to specify "plain sawn", and buy one free from knots and defects. Even if you buy your board at a lumber yard, most likely it will come to you rough sawn, the way it left the sawmill. Clues through its rough exterior will help you choose a board to suit our purposes.

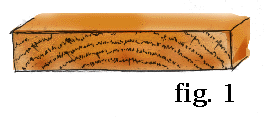
A view from the end of a plain sawn board will reveal a grain pattern similar to the one shown in Figure One. Grain direction relative to the sides and surfaces of the board identify it as plain sawn.

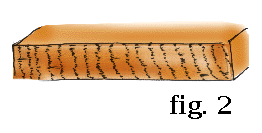
Quarter sawn wood, cut exactly the opposite of plain sawn, appears as in Figure Two from the board’s end. The annual rings are perpendicular to the surfaces of the board.

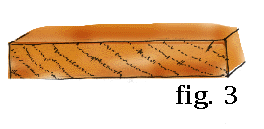
Rift sawn is that sawn board between the two, graded as such when the end grain runs at 45° angles to the surface, as in Figure Three.
Imagine two boards sawed from opposite sides of the same log. One board is sawed out so that its length pretty much parallels the length of the tree. The other board comes out so that one end is close to the outside of the log while its other end lies near the center of the log. Kind of tilted in the log. The first board is much more preferable for bows. Its grain pattern will be evident through its rough sawn exterior. Its rings follow the edge and do not run out, as viewed from the side, edge or thickness (three words for the same place) of your board. Its identity can also be read from a surface or width view. The rings show a long feather point pattern pretty much down the center of the board, as in Figure Four.

If the feather patterns are closely spaced and rounded off down the width of the board, you can almost bet grain will run out on the thickness as well. And vice versa. Its surface and its edges will look like the board illustrated in Figure Five.

Usually this phenomenon happens not from tilting the board in the log, but from sawing straight boards from curved logs. These boards tend to be full of stresses and much less stable than the plain sawn boards with parallel grain of Figure Four, so that when you rip them they peel off in all directions, sometimes pinching the saw blade, sometimes parting away from it.
Either at the mill where you bought it, or at some custom woodworking shop, have the board surface planed two sides and joined both edges. This milling procedure will square your timber up and provide you clean smooth surfaces. Don’t be reluctant to ask the mill hand to please send the board through the planer in the direction that will minimize tear-out. You don’t have to know what you’re talking about, but if he doesn’t know, you should probably take it somewhere else. Chances have increased dramatically he will butcher your wood, and, additionally, he will do it with machinery that will exaggerate his mistakes.
After the board has been surfaced to optimal thickness (somewhere around 7/8 inches), and squared on its sides, cut it into 4 foot lengths. Lay out one test section so that you come out with as nearly a matched number of quarter sawn pieces of a 1/8 inch thickness on the one hand, and plain or rift sawn pieces of 3/8 inch thickness on the other hand, all of like or similar width.

Notice (see Figure Six) that if you rip 1/8th inch strips from the middle of the board, you end up with quarter sawn stock. If you rip 7/8 inch square sections from the outside edges of the board and then resaw them into 3/8th inch stock, you end up with plain sawn or rift sawn stock.
Request that the mill use either a hollow ground high speed steel rip blade with no set in the teeth or a smooth cutting carbide rip blade so that the pieces come off the table saw with their faces suitable for glue-up. If the blade is dull and burns the faces or if it lacks stability and wobbles and damages them or if it cuts rough and scores them badly from a tooth out of set, then cut them all slightly oversize and run them back through the planer to finished dimension. Try as best you can to avoid this additional cost in mill time by choosing your shop smartly.
Since these boards usually come in random widths and lengths, for the most part, you will be left on your own to gain an idea of how much of each combination to cut.
Assume the board in Figure One nets a fat 7 inches wide. Ripped and resawn (while allowing for an 1/8th inch saw kerf of waste with each cut), it yields 10 pairs of quarter and plain sawn pieces, enough for ten bows, as shown in Figure Six.
Our purpose now is to mate each plain or rift sawn thick piece with each thin quarter sawn piece, and our goal is to glue these mates together, as many as we can at once, as quickly as we can. To that end, cover your work surface with newspaper, and then lay a 4 foot length of waxed paper immediately before you. Set your open clamps to one side and your glue bottle and brush to another.
In a mock run, lay as many as eight mated pairs across the newspapers, opened like bread slices for peanut butter and jelly sandwiches, inside surfaces up. Time yourself. Pretend to squeeze a bead of glue down each strip. Then brush over all 16 pcs. as though to spread the glue, fold each "sandwich" together and lay it along its edge on the waxed paper until all eight pairs are laid side by side in a giant Dagwood sandwich, "crust" lying down on the waxed paper. Lay a C clamp across the middle and tighten enough to bring everything together with the pressure you might require to squeeze a little glue from the joints. Work from the middle toward either end, spacing the clamps evenly, making sure that the tips come together.
How long did you take? Add a little extra time to that because when the pieces are buttered with glue and pressure is exerted on them, they will tend to slide away from each other, requiring you to reposition them and to tighten clamps down the line a little at a time.
Under average room temperatures, you will have about a ten minute window for spreading and clamping white glue (which has slightly better gap filling properties than yellow). If you feel you need longer, right before you begin, very lightly mist both glue surfaces with water from a spray bottle. Make sure also that the outside pieces of each Dagwood sandwich are the thicker plain sawn belly pieces rather than the thinner quarter sawn back pieces, this for the greater rigidity they provide in exerting more even pressure along the cramped glue joint.
If you lack for clamps to provide even glue pressure along the length of your set-up, consider removing a few pairs of wood and placing 7/8 inch square battens to the outside to stiffen your sandwich.
Unless you have wetted the glue surfaces beyond need, you can remove the C clamps and glue up the next batch of bow blanks within an hour, continuing through an evening’s work until you’ve glued up all your bow blanks. Scrape off excess glue while you wait for the next batch to dry. Set them aside to cure for several days.
If you started out with an 8 foot board netting over 7 inches in width, and if your bows are all about four feet long, you have 20 blanks for your toil. Not only enough to arm the neighborhood, but spares for the invading hordes that will come begging as well. Even enough that a few won’t be missed from the batch should you decide to have some fun where your own bow muse directs you before I get back here with the next installment.