 |
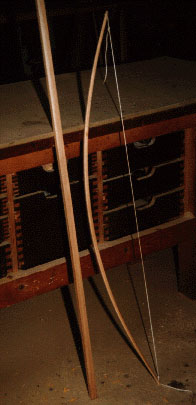
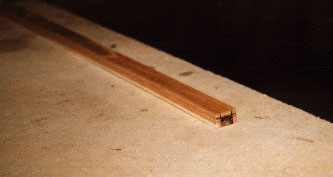
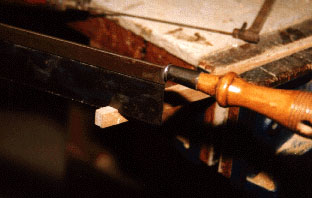
One stave blank, untrimmed, typical of those produced from the instructions contained in "Starting at the Beginning". One bow bending, the result of wood removal by formula. |
Now that we have a pile of staves for kids’ bows, the next step is to make them bend. We want a mini production run and not too much fuss. We want to work quickly and efficiently because the idea is to get bow staves and bows into kids hands. We do this best by keeping decisions to a minimum.
By using laminated staves for our kids’ bows we’ve created wood far less likely to splinter and break apart in little hands. Indeed, wood put together this way is so durable that we barely have to concern ourselves with its tiller. Which is good, because we don’t want to. We want to forget about theories, graphs and charts, forget about draw weights and draw lengths, forget about Platonic standards of perfection, forget about mystical illumination and instead just make wood bend. We want to make tiller happen as a consequence of mindless wood removal.
|
One stave blank, untrimmed, typical of those produced from the instructions contained in "Starting at the Beginning". One bow bending, the result of wood removal by formula. |
Whichever limb design you choose, the concept remains the same: to remove wood in a taper from the handle to the tips so that the bow bends smoothly—or close enough. Indeed, tillering a bow means little more than distributing flex along the length of its limbs so that the bow bends smoothly. We distribute flex by removing wood from a stave so that the wood remaining bends smoothly. The further we proceed from the handle to the tips, the more wood we need to remove so that the bow bends smoothly. With these bows, there is nothing more to it. The concept of TILLERING does not change when you make bigger bows, either. There is no jump. Now that you understand tillering, you never have to be intimidated by it on laminated self bows again. So.
Another principle that remains the same with these bows as with more sophisticated versions is this: Once established, pretty much leave the back alone. Do all tillering from the belly and/or the sides (so the bow bends smoothly).
Let the limb design you choose be determined by the means you have, the method you use. If you intend removing wood with hand tools (rasps, planes, surform), do it from the sides and the belly. If you have a bandsaw (and a squared stave and a steady hand), you may wish to rip the waste from the belly only. Split the layout line--cleaning up the ragged kerf marks will bring this limb's mass in line with the other two. If you have a belt sander and time enough (or a table sander and fingers enough) you can mount the coarsest grit available to you and grind sides and belly. If you have access to a joiner table, you can choose either of the three methods you wish, though working sides and belly is recommended (unless you want to leave wide limbs for decorating).
A word of caution regarding the last technique. Tapering a thin 48" piece of hardwood on the joiner (by laying the handle and one limb over the outfeed table while pushing or pulling the other limb along the infeed table into the cutterhead) is not something for novices. If you are experienced and careful, you can churn out bows this way. If you want to send them to a mill and have them done professionally this way, that's fine too. Have the mill hand set the infeed table down almost to 3/16th of an inch and it shouldn't cost but six wipes on the joiner per stave. The fun work lies ahead anyway, where you and small people can work more as partners, so there's no shame in getting an estimate and hiring this job done.
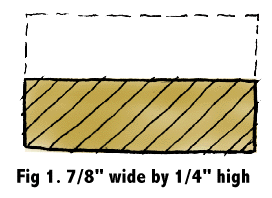
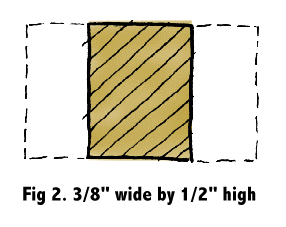
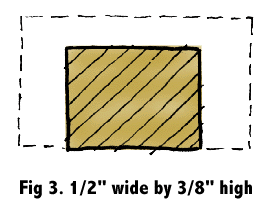
Pencil out about a 6" or 7" inch section from the middle of each stave and call this the handle area. Stay out of it. The taper begins from the end of the handle area and in each direction increases uniformly as it approaches the tips. If our stave blanks came out anything close to 1/2" in thickness and 7/8" in width, here follow illustrations viewed from the tip or nock end suggesting the amount of wedge-shaped wood to remove by the end of each taper, at the tip of the stave. (Seen with the 3/8" thick plain sawn belly up, and the 1/8" thick quarter sawn backing down.)
You may wish to pencil out the taper lines with a straight edge on the first several bows if you grind them or do them by hand, but once you have the hang of it, simply laying out one of these three following patterns onto the tip end and coming at it from the handle will speed the work. If you fear getting lost, check your progress with a straight edge. Anything close to straight will work.
From the belly only, remove a 1/4" wedge, so that the tip measures 7/8" wide by 1/4" high:
From the sides only, remove 1/4" from each, so the tip measures 3/8" wide by 1/2" high:
From the sides and the belly, remove 3/16" widths from both sides and 1/8" from the belly, so the tip measures 1/2" wide by 3/8" high:
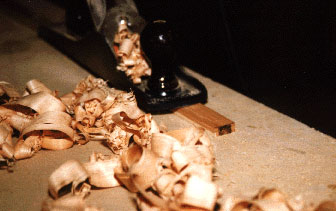
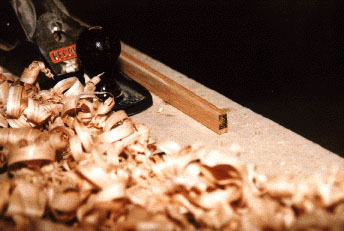
The next three photographs illustrate the process for hand planing from the sides and the belly.
Lay out the pattern on the end, belly up:
Plane off the belly:
Plane off one side and then the other:
There remains nothing more to roughing out this bow than to cut in nocks and chamfer off all sharp corners. If you choose to, you may glue on a riser. A riser is completely optional, as a comfortable handle can be wound up from cloth (next chapter).
You can either file or cut or whittle string grooves into the tips or whittle out pin nocks. Pin nocks get my vote. They are quick and easy to fashion and provide crisp shoulders for the bowstring.
If you have a tablesaw, simply set a cross cut blade up 1/8" above the saw insert and move the rip fence about 5/8" away from the outside of it. Use the mitre gauge to cut square shoulders 1/8" deep into all four positions, and then remove all waste to that depth out to the end of the tip either by whittling it off or by dragging it a little at a time across the saw blade to dado it off.
Otherwise by hand, with a fine cutting saw such as a mitre saw or a dovetail saw or even a coarse hacksaw blade, cut shoulders 1/8" deep into the four positions along the sides of the stave about 5/8" from the ends, at an angle toward the belly, whittle out waste and clean up with a file. Round off tips.
Any hardwood scrap will do for a riser. Square stock the same width as the bow and about 4 inches long, mitred or rounded over at each end, works nicely. Perhaps you have some lengths left over from your original plain sawn board that can be put to this use. After the bow has been "tillered" and before its corners have been chamfered, glue the handles to the geographic centers of the stave using a C clamp or two for pressure. Again as before, watch that they don't scoot around and misalign, and be careful not to tighten so much as to starve the glue joint.
(A tip to prevent scooting: Space apart two small wire nails, say 18 gauge, into the glue surface of the riser block. Drive them in only well enough so they hold and then nip the protruding shank off with side cuts. Sharp stubs barely proud of the block will remain. Position and press the riser onto the stave so these stubs create indentation marks. After you spread glue, the stubs and their registration dents will mate to reposition the riser and keep it from scooting.)
After the joint is dried or after the nocks have been cut (if you do not glue on additional handle material), either with a half round bastard or with a cabinet scraper, radius off all corners. Make sure younger hands wear jersey gloves on both hands if this duty falls to them. Otherwise the risk of cuts or abrasions might dampen enthusiasm. If you've glued on a riser, round the palm side over for a comfortable hand hold.
Either wrap a quarter sheet of coarse (80 grit) sandpaper around a block, or fold it as you would a letter for an envelope, and let gloved hands get to sanding, too, especially on the corners and edges everywhere to soften them up. Coarse paper grabs to the glove and won't keep slipping from small hands; it makes sufficient dust to show progress and maintain interest, too.
Next time we'll consider some decorating and finishing possibilities and build a quick bowstring from our drapery cord (maybe even use some for a handle wrap). Start looking around for personalizing curiosities to glue or tie to bows: feathers, beads, fur, etc. Get the kids practicing with magic markers on multi-colored geometric patterns or on animals and stick figures and hunting scenes that they can bring over to the bow limbs when time comes. Try some yourself if you have no self restraint, only don't hog the magic markers.