CRESTING - PART 1
I have heard that the art of cresting dates back to the times of English longbowman who crested their arrows as a means of identification. In recent times cresting has become more of an art form used to enhance the appearance of arrows. Who wants to shoot a custom longbow or recurve made with exotic woods and not shoot arrows made with the same kind of attention to detail.
Cresting arrows is one of those things that just takes a little practice to make perfect. The first arrows that I crested were just horrible. However, with a little practice and some advice on proper equipment and techniques it won’t take long to turn out some really nice arrows. The first bit of advice that I can offer is to take your time and don’t get in a hurry. Every time that I have messed up while finishing an arrow, it is due to getting in a hurry.
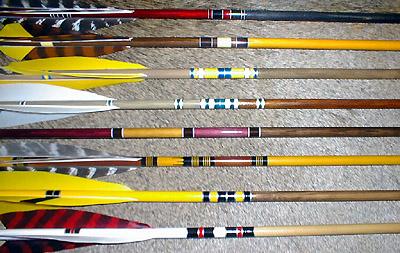
The Photo above shows a number of different crests. As you can see they range from some fairly intricate crests to very simple crests. The problem with the real intricate crests is that it is difficult to make a dozen exactly the same. These days, I have been making simple crests, but work real hard at making the arrows very uniform and making the cresting lines very straight. Actually I think that an understated design is much better looking than a highly embellished crest (just personal preference here).
You do need some equipment and supplies to properly crest arrows. The most significant piece of equipment is a cresting machine. You can either buy a commercially made cresting machine such as the Bohning crester shown in this photo:

or make your own. If you build your own you will need an electric motor that will turn at somewhere around 300 rpm. I have seen some real nice homemade cresters made using old sewing machine motors which were variable speed and could be operated using a foot pedal. I have also heard that a motor from an electric can opener is a good choice, although I have not personally tried one. Two important parts of a homemade cresting machine can be purchased for a reasonable sum. A cresting chuck, which is the part that holds the arrow in place can be bought for about $6. The chuck has a small rubber gasket that holds the arrow in place while it is being turned. Also, a felt v-block can be purchased for about $4. The felt is real nice because it will not scratch the finish on your arrow as it is being turned.
The only other materials that you will need are paint brushes, paint and thinner. I believe that it is really important to use good brushes when cresting. Wide bands can be made with wider brushes while the thin lines need to be made with a very small, pointed brush. I generally purchase my brushes from an art supply store. A good brush will cost $7 - $10 but will last a long time if you take care of it. There are a number of different kinds of paints (and other materials such as marking pens) that can be used successfully for cresting. The important thing is to make sure that the paints that you use are compatible with the clear finish that you are using. Some of the more popular cresting paints are Bohning, Testors, and various brands of automotive touch-up lacquer.
In the next section, I will discuss cresting techniques and more details about paints and markers.