The Riser
If desired, an accent stripe can be laminated into the riser using any
combination of hardwood. Its important to note here that the stripe cannot
extend into the working part of the fadeout. This is why you see a lot
of curved accent stripes is bows. Properly assembled accent stripes, besides
adding beauty, also increase the strength of the riser.
After transferring your riser pattern to the riser block, cut out the
general riser shape. There is no need to bother shaping the grip or cutting
out the sight window until the bow is all glued up. You have to now shape
the curved aspects of the riser until they are smooth and taper into a
feathered fadeout. A drum sander works well for this project, but a good
job can also be accomplished using a scraper and/or sandpaper. Keep the
risers limb faces square to the sides of the riser. The fadeout needs to
be paper thin, to prevent a weak area where the limb laminations wrap around
the riser. Measure up from the end of the riser 1". At this 1"
mark, the riser fadeout area should be no more that 1/16" thick; at
2" no more than 1/4" thick. The riser thickness from here on
can increase rapidly, but should be an a smooth arc without any high or
low spots. The risers back profile should match the profile of the form
as close as possible to prevent any air pockets, which will not only be
unsightly under clear glass but may also affect the strength of the bow.
Here are the basic steps for the gluing process. It is best to complete
a dry run first, before you actually start using glue. This will allow
you to make sure that everything needed is in place.
1. Make all laminations and the riser, the same width as the
form.
2. Bevel the necessary wood laminations
3. Cover the smooth side of the fiberglass with easily removable
masking tape. Cut one fiberglass strip in half.
4. The first lamination placed on the form will be the full length
fiberglass strip. Take a small triangle file and notch the edge of this
strip at its centerline. This will allow you to keep it aligned with the
center mark of the form.
5. Clean off all of the wood laminations, fiberglass and riser gluing
surfaces with acetone.
6. Lay the laminations out in the order that they will be used.
7. Make sure that the form is free from any debris then cover the
profile of the form with thin plastic to prevent the bow from sticking
to the form.
8. glue up the full length glass strip and place it on the form,
aligning the notch with the centerline of the form
9. IT IS IMPORTANT THAT BOTH FACES OF A GLUE JOINT ARE COVERED WITH
GLUE AND THAT THERE ARE NO DRY SPOTS. ALWAYS REMEMBER, WET-TO-WET, OTHERWISE
DELAMINATION IS ALMOST SURE TO OCCUR.
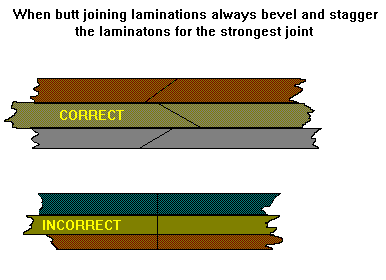
10. Glue up and put into place all of the back laminations, remembering
to stagger the beveled joints approximately 1" from the centerline
of the riser. See the following illustration.
11. Glue up and place the riser into position, making sure that
the center of the riser is over the center mark of the fiberglass and of
the form.
12. The belly parallel lam is now glued and put into place, followed
by the short fiberglass strips.
13. Cover the glued up bow with another appropriate sized piece of
plastic film and place the pressure strip on top of it.
14. Next goes the air hose.
15. Finally the top of the form is put into place and bolted down.
16. Inflate the air hose with 60-70 psi, while watching to make
sure that the hose stays centered on the form and does not slide to one
side or the other. Also check to make sure that the side plates aren't
adjusted to high.
17. Place the form into you heat box and heat for 7-8 hours, stirring
occasionally. (Just checking to see it you're alert.)
18. After the heat box turns off, resist the temptation to lift
the lid for at least another 6 hours. Go shoot a bow, mow your lawn or
take a nap, depending on your spouses wishes and temperament at this stage
of your project.
|

|
|

